Words and photos by Harald Zoschke
My wife Renate and I lived in Florida for a couple of years, during which time we acquired a taste for pastrami sandwiches from the nearby “Kopper Kitchen” restaurant. When we returned to our native Germany to start that country’s first fiery-foods shop, we had a problem: Pastrami is completely unknown here, and our beloved lunch classic was sorely missed.
You Say Pastrami, I Say Pastrama
Pastrami sounds Italian, but the roots go back to Romania, where the term pastra means “to preserve.” The pastrami technique was originally developed as a way to preserve meat before the days of modern refrigeration. Back in the second half of the 19th century, it was introduced to the United States by Romanian Jewish immigrants from Bessarabia and Romania. Some sources claim the original spelling was “pastrama,” closer to the Romanian original, possibly later modified to “pastrami” to make it sound more Italian, like salami.
Basically, pastrami is what you get when you smoke a side of corned beef, instead of boiling it. The problem: in Germany, corned beef is not sold in whole slabs but instead is shredded to death and packed in gelatin.
After doing some research online and talking to German friends who had attempted it, we decided to give pastrami-making a try. American pastrami purists may raise their hands and pull their hair, but hey, this was our experiment…and the result wasn’t bad at all.
Making pastrami requires three steps: Soaking the meat in brine, smoking it, and (traditionally) either steaming or boiling it. We chose to skip the steaming, as our finished pastrami would be fully cooked. If you’re lazy and/or lucky enough to live someplace where pre-brined packaged corned beef is readily available, you can skip all the brining steps and go straight to smoking.
1. Choose the Beef
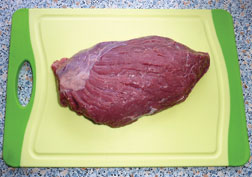
We started with a two-pound rump roast, but a lean, lightly marbled brisket flat would be great, too. Go for just a little fat, as that might turn a bit rancid. If the cut has too much fat, ask your friendly butcher to trim it for you.
2. Mix Up the Brine
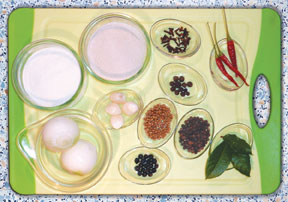
1 quart water
1 cup coarse kosher salt
1⁄2 teaspoon Pink Salt or Morton’s Tender Quick
3 tablespoons brown sugar
2 yellow onions
4 cloves garlic
1 tablespoon black peppercorns
3 bay leaves
1 teaspoon cloves
1 teaspoon allspice seeds
2 teaspoons coriander seeds
1 teaspoon juniper berries
3 small chile peppers, dried (Thai or bird’s eye)
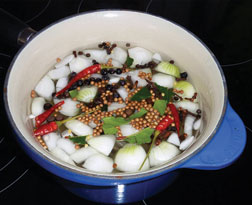
In a small saucepan, bring water to boil, add the curing salt and sugar, and let dissolve.
Peel the onions and cut into pieces, then peel and lightly smash garlic cloves with a knife.
Add the onions, garlic and all spices to the water and simmer for a few minutes.
Let cool, refrigerated, preferably overnight.
3. Add the Meat
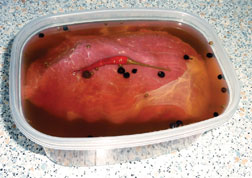
Rinse the meat, pat dry and place it in a non-reactive, sealable container just large enough to accommodate the brine and the meat.
Add enough brine (including spices) to fully cover the meat.
Seal and store the container in the refrigerator for 8 to10 days. The duration depends on the weight/size of the meat. We heard that four days per pound could be used as a rule of thumb, which means you can save time by using a couple of smaller meat pieces rather than one huge piece.
4. Smoke the Pastrami
After 8 to10 days, take the meat out of the brine, rinse it, and pat it dry. Cover and bring the meat to room temperature while you’re firing up the BBQ smoker.
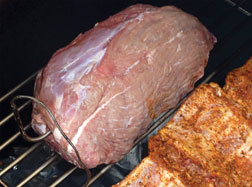
We used a bed of eco-friendly charcoal briquettes made from coconut husks and shells, with chunks of beech wood on top, as well as some wood from an apricot tree. Use whatever smoking wood you prefer. We’re actually smoke-cooking the meat, so bring your barbecue smoker to 250 to 300 degrees F. and place meat on the grate in the smoke chamber, away from the firebox. A digital thermometer with a probe comes in handy to monitor internal meat temperature.
Smoke the meat at 250 degrees F. for 4 to 5 hours. Smoking at temperatures as low as 230 degrees F. will result in more tender meat, but will also take considerably longer. Don’t let the smoker temperature exceed 300 degrees F. Note: The actual temperature at grate level will be a bit lower, as most smoker chamber- or grill-cover thermometers are positioned higher than the grate. The meat will be ready when the internal temperature has reached about 185 degrees F.
5. Apply the Glaze
Mix up the following ingredients for the meat glaze:
1⁄3 cup sweet and spicy BBQ sauce of your choice
1 tablespoon coriander seeds
1 tablespoon juniper berries
1 tablespoon black peppercorns
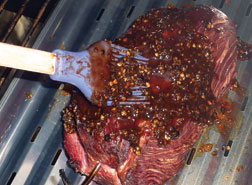
Coarsely crush peppercorns, coriander seeds and juniper berries;, mix with BBQ sauce and heat in a small pot on top of the firebox. When the meat reaches an internal temperature of about 170 degrees F., generously brush all sides with the glaze and close the smoker chamber. It will probably take another hour to finish the pastrami (it took six6 hours for our two-pound piece).
6. The Finished Pastrami
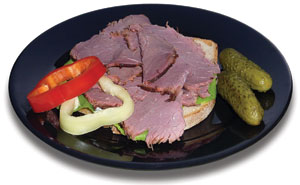
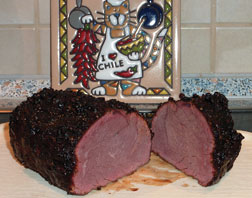
Take the meat out of the smoker and let it rest for about 30 minutes wrapped in aluminum foil. Serve it thinly sliced on rye bread with some great brown mustard and a kosher dill pickle, if desired. The photo shows our finished pastrami, fully cooked in the smoker. The red color comes from the curing salt, and it has a nice “smoke ring” on the outside. Pastrami keeps well in the refrigerator for up to seven days. To re-heat the pastrami, we found it helpful to slice the cold meat before microwaving it. Freeze larger leftover pieces.
The taste of our pastrami was somewhat different from what we had at the Florida restaurant and at various delis, but it came pretty close, and everybody in the family raved about it.
What the Heck is Curing Salt?
This from Mike Stines, Ph.B.:
Pink Salt is the same as InstaCure and Prague Powder # 1. All are a combination of sodium nitrate and table salt. The customary usage is two teaspoons for 10 pounds of meat. An alternative is saltpeter (potassium nitrate), if you can find it. Two tablespoons of saltpeter will cure a six-pound brisket. Most modern recipes have substituted sodium nitrate for saltpeter because saltpeter is difficult to obtain.
Curing agents are customarily used for sausages and other meats that are smoked at low temperature to prevent the growth of harmful bacteria during the long smoking process. Neither are required to prepare corned beef but they will help retain the red color of the meat (without the curing agent, the meat will turn gray). I usually don’t use either but the beef must be “corned” under refrigeration for 10 to 14 days (some suggest up to three weeks). I would suggest one cup of kosher salt for the brining mixture. I also recommend soaking the meat for one hour per pound after brining to reduce the saltiness before smoking (for pastrami) or simmering (for corned beef).
Latest posts by Harald Zoschke (see all)
- Peperoni Cruschi Part 2 | Frying Them Up - 01/02/2020
- Spaghetti con Peperoni Cruschi - 01/02/2020
- Peperoni Cruschi | Crunchy Treat for Pepper Lovers - 12/31/2019




Comments
Pastrami recommendation for northern CA travelers… Skipping the overpriced hotels in Yosemite Park, we recently stayed overnight at a hotel in Oakdale, CA nearby. For dinner, locals recommended “Ferrarese’s Deli Restaurant” on 1161 East F Street. I’m glad they did. At this rather small place with just a few tables (and we were lucky enough to get one), I ate one of the best hot pastrami sandwiches I’ve ever had. If you don’t get a table, order one for take-out. Renate had a smoked BBQ brisket sandwich which was also generously loaded and delish.
–Harald
This from Burn! Blog’s Editorial Director: If we’re plugging favorite corned beef restaurant experiences here, I’ve got to mention the Slickrock Cafe in downtown Moab, Utah. I was visiting last weekend and specifically went there to have one of their “Oowah” Reuben sandwiches. I’d had it about a year earlier and it was hands-down the best Reuben I’d ever eaten. I don’t know if it’s the fantastic marbled rye, the sauce, or the extremely lean but tender meat, but the combination was sheer magic. Maybe it was helped along a little by a long day spent playing among the red rocks of Arches National Park, who knows?