


By Mike Stines, Ph.B.
 I truly enjoy oysters… fried oyster po’boys, grilled oysters, oysters Rockefeller, Devils on Horseback and the best – raw on the half shell with a spritz of fresh lemon and a dash of hot sauce or with a mignonette or cocktail sauce.
But opening oysters is difficult and a good way to impale your palm with the oyster knife. Of course you can get your fishmonger to shuck the oysters but it will usually add $1 to $1.50 per oyster that makes them an expensive appetizer… it costs more to have them shucked than to just purchase the oysters. But, there is an alternative!
In 1996, Sherry and Larry Schneider opened King Eider’s Pub in the coastal community of Damariscotta, Maine. Shortly thereafter, it became one of the few restaurants on Maine’s midcoast area serving oysters. Although Larry and Sherry no longer own King Eider’s Pub (they sold the business in 2003), the restaurant currently opens as many as 1,000 oysters each week. (Schneider says some of his commercial customers open as many as 5,000 oysters a day using the Aw Shucks!)
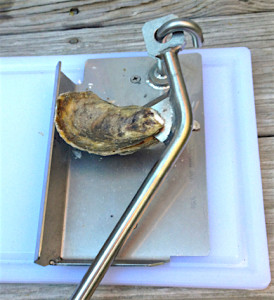
In 1996, Larry created an oyster shucking tool that would outperform and be safer than any other oyster utensil on the market. The Aw Shucks! Oyster Shucker is made entirely of 316 grade stainless steel. Unlike other shucking devices, Aw Shucks! opens the oyster horizontally retaining the “liquor.” And the best part… it’s almost impossible to injure yourself.
“We’ve sold them all over the world,” Schneider notes. “Eighty percent of our sales is the homeowner who loves bivalves, yet rarely buys them to take home, as they are simply not adept at opening them with the prospect of an injury.”
I used the New England-made Aw Shucks! with the mounting board option… an option I recommend unless you want to drill holes in your countertop or butcher block kitchen island to permanently mount the opener. Aw Shucks! worked great… easily opening a dozen Barnstable harbor oysters in a fraction of the time required to open them with a shucking knife. It only took about five minutes to open the oysters. Based on prior experience if I was using an oyster knife it would have taken about 20 to 25 minutes to do the same task.
As a sidebar comparison, the top oyster shucker at the 2016 16th annual Wellfleet Oysterfest “Shuck Off” opened 24 oysters (by hand) in two minutes and 28 seconds. Penalties assessed for shell bits in the oysters, oysters that were cut during shucking and oysters that weren’t completely separated from the shell increased his overall time to three minutes and 29 seconds.
Aw Shucks! comes in two sizes, one for common oysters (such as Atlantic oysters that have a salty and briny taste) and another slightly larger arm for smaller oysters (less than three inches… such as west coast Olympia that have softer and creamier flesh, some with a metallic taste). The larger arm may also be used to open Littleneck clams. The unmounted regular shucking tool is $185. You can also get the unit mounted on a 9-inch by 15-inch polypropylene cutting board with a groove around the edge to catch any spilt oyster liquor for $225. Shipping is not included. Both options are less expensive than a trip to the hospital’s emergency department to repair a shucking injury!
But don’t throw away your oyster knife. You’ll still need it to cut the adductor muscle that attaches the top shell and loosen the oyster from the bottom shell. Aw Shucks! pops the oyster’s hinge… the hardest part of opening an oyster… but you still need to do some clean-up.
After thoroughly scrubbing the oyster with a nylon-bristle brush, place it on the Aw Shucks! cup side down. Place the wedge-shaped blade in the hinge of the oyster and slide it into the oyster. The shell will pop open. Transfer to a plate. When you’ve opened all the oysters finish the preparation by sliding an oyster knife along the underside of the top shell and remove it. Then slide the knife under the oyster flesh to release it from the shell. Place the prepared oyster on a bed of crushed ice and continue until all the oysters are prepared.
(An interesting side note I discovered researching this article: Recreational oyster harvesters in Washington State are required to shuck their oysters on the beach and return the shells to the water from where they were harvested.)
A while back I wrote a comprehensive article on seafood and shellfish. You can find the Fiery Foods Central article here. But if you’d like a very definitive guide to oysters, Rowan Jacobsen has written The Essential Oyster. The 293-page book, published by Bloomsbury in October 2016, covers almost every variety of oysters and includes well-styled color photography of nearly 100 varieties of oysters.
If you don’t prefer oysters au naturel, here are a couple of recipes to “dress” the oysters but use them in moderation to not mask the oyster’s natural flavor…
Spicy Mignonette
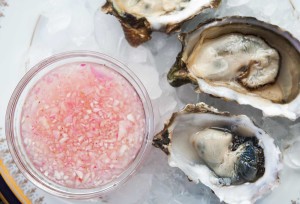
Mignonette is a classic vinegar-based sauce served with oysters and other raw shellfish although many will argue oysters need nothing except perhaps a squirt of fresh lemon juice. This adaption adds a bit of sweet heat to the sauce.
1/4 cup red wine vinegar
1/4 cup champagne vinegar
3 tablespoons minced shallot or 1 tablespoon dried
2 teaspoons Sriracha sauce (or more to taste)
1 teaspoon freshly ground black pepper
1/2 teaspoon fresh thyme, finely minced or 1/4 teaspoon dried
If using dried shallots, rehydrate the shallots in 1/4 cup of warmed red wine vinegar for 30 minutes. Drain the shallots, reserving the vinegar. Add enough vinegar to make 1/4 cup and reserve.
Combine the reserved red wine vinegar, champagne vinegar, shallot, black pepper and thyme in a small bowl. Add the Sriracha, whisk to combine. Allow the Mignonette flavors to combine for at least one hour. Serve at room temperature.
Yield: Enough for two dozen oysters
Heat factor: Mild to medium depending on amount of Sriracha used
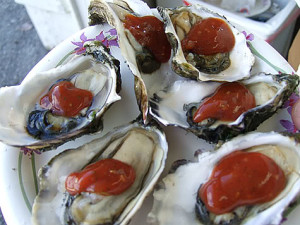
Cocktail Sauce
1/2 cup good-quality ketchup (I prefer Heinz)
1/2 cup chili sauce
2 tablespoons prepared horseradish, well drained
1 tablespoon tomato paste
2 teaspoons Worcestershire Sauce
2 teaspoons lemon juice
2 teaspoons minced garlic
2 teaspoons chopped capers
1 teaspoon Old Bay Seafood Seasoning
1/2 teaspoon hot sauce (or more to taste)
Coarse kosher salt
Freshly ground black pepper
Combine all of the ingredients in a small bowl and stir well. Season to taste with salt and pepper.
Prepare this sauce at least one hour in advance to allow the flavors to blend. This sauce will keep, refrigerated and covered, for at least two weeks.
Yield: About 1 1/2 cups
Heat factor: Medium
(Mike serves as our BBQ, Grilling and Gadgets editor. He has a yard full of cooking hardware – a couple of WSM smokers, two propane-fired grills, a Grill Dome Infinity XL ceramic cooker, a Yoder YS-640 pellet cooker and a bevy of miscellaneous cooking equipment. His garage has no room for a car… it’s filled with more cooking gear, various accessories, cases of wood chips and bags of pellets. His third cookbook Mastering Barbecue is published by Random House.)
Latest posts by Dave DeWitt (see all)
- Enchiladas Verdes con Chile Pasado - 02/08/2023
- Smoked Oysters with Ancho Chile Sauce - 01/13/2023
- Machaca Sierra Madre - 01/11/2023
