


 By Dave DeWitt and Paul W. Bosland
Excerpted from The Complete Chile Pepper Book
We love chiles in whatever form we can get them, but there is something special about fresh chiles—they have a flavor and texture that cannot be duplicated by canned, dried, or frozen chiles, and they bring bright colors to summertime meals. So naturally, the first way to handle a mega harvest, is to consume as many of the fresh chiles as possible.
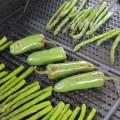
The easiest method is to use a barbecue grill. Place the pods on a grill about five to six inches from the coals or gas flames, turning them often. Blisters will soon form, indicating that the skin is separating, but take care that the pods are blistered all over or they will not peel properly. Although the pods may burn slightly, take care that they do not blacken entirely or they will be overcooked and will be nearly impossible to peel. The idea is to use intense heat for short periods of time rather than low heat for a long time. During the charcoal roasting process, the sugar and starch caramelize in the chile, which imparts a “cooked” flavor, while a rapid roasting over high heat leaves the chile tasting more “raw.” And, during the roasting process, why not save a few perfectly formed pods and make a classic dish of chiles rellenos—stuffed peppers? Remove the pods from the grill with tongs and immediately wrap the chiles in damp paper towels and place them in a plastic bag to steam for ten to fifteen minutes. For a crisper, less cooked pepper, plunge the pods in ice water to stop the cooking process.
After the chiles have cooled down, it’s time for the final step. If you’ve done a good job of roasting your chiles, peeling them is fast and easy. Simply start at either end, and pull off the skin, wearing gloves, of course. We generally pull from the tip back towards the stem, but it depends on the roasting job. Occasionally, you will run into problems with the deep indentations, or “valleys” on the pod; it is difficult to blister those “valleys” without burning the surrounding areas. In these cases, you simply have to go in with a knife and scrape off any remaining skin.
At this point, most people like to cut off the stem and remove the seeds. The easiest method is to simply cut off the very top of the chile along with the stem, and then scrape the seeds out of the open end. If you really want to reduce the firepower, you can also remove the veins (the placental tissue) that run the length of the pod and serve to attach the seeds to the pod.) You’ve now completed the whole process and have a chile pod that is ready to eat, cook with, or freeze.
The complete guide, with instructions for freezing your chile harvest, is here.
Latest posts by Dave DeWitt (see all)
- Enchiladas Verdes con Chile Pasado - 02/08/2023
- Smoked Oysters with Ancho Chile Sauce - 01/13/2023
- Machaca Sierra Madre - 01/11/2023

Comments
Excellent guide. When I was growing up in NYC, my Mom used to roast bell peppers using the flames from a burner on our gas stove. We lived in a small apartment so outdoor grilling wasn’t an option. Once the skin was nicely blistered and loose, she’d immediately place the roasted peppers in a small brown paper bag, scrunch down the top to close tightly, and stick the bag in the oven, which was OFF of course, to let the peppers steam. After a few minutes she’d remove the peppers from the bag and use her bare hands and a damp paper towel to peel them. After removing the stem and seeds, she’d stuff them with her fabulous picadillo for Cuban “pimientos rellenos” or stuffed peppers. Deee-licious!